
Planning Your Brochure Design
When you’re pondering about creating brochures, it’s like setting up a game plan. You don’t shoot for the goal right off the bat, do you? Nah, we need a little planning first. The same process applies to brochure design.
So, how do you go about planning your own brochure? You’ll want to start by clearly defining your purpose. Are you creating a brochure to inform, to advertise, or perhaps to entertain? What’s the story that you’re trying to tell? Make sure to keep the brochure purpose in mind during the entire process.
Next, carefully consider the layout of your brochure document. Will it be a folded brochure, maybe a tri-fold brochure, or perhaps a two-page brochure? Keep in mind your intended audience and the amount of content you need to present, these factors can influence your final decision. In terms of layout and orientation, Google Docs provides various options for both portrait and landscape, a.k.a., different page orientation. You can access these under the “file menu” then the “page setup options”!
Alright, now let’s talk about content. What’s a brochure with no meat to it, right? Jot down what you want to include in your brochure – maybe it’s a mix of text, images, and graphics. When deciding on what to include, consider your key messages and how they can be visually represented. Don’t forget to plan for some placeholder text at this stage.
Lastly, don’t forget about the visuals – the eye-candy! Think about the color scheme and visuals that will compliment your content and engage your reader. Your design should be compelling, but not so complex that it distracts from your message.
Got your plan ready? Great, now let’s bring that to fruition. We’re off to our next chapter – firing up Google Docs and choosing our template.
Step1: Accessing Google Docs and Choosing a Template
Before we even begin creating our brochure, we’ll need to ask you one very important question: got Google? No? Well, you’re gonna need it. Open Google Docs through your browser or app. If you don’t have an account yet, don’t worry, it’s as easy as pie.
Once you’re logged in, you’ll land on the Google Docs interface. This might be an existing document if you’ve been here before, or it might be a new blank document. Regardless, the next step is to navigate to the template gallery. The option for the template gallery is usually located on the top right area of the drop down menu – can’t miss it!
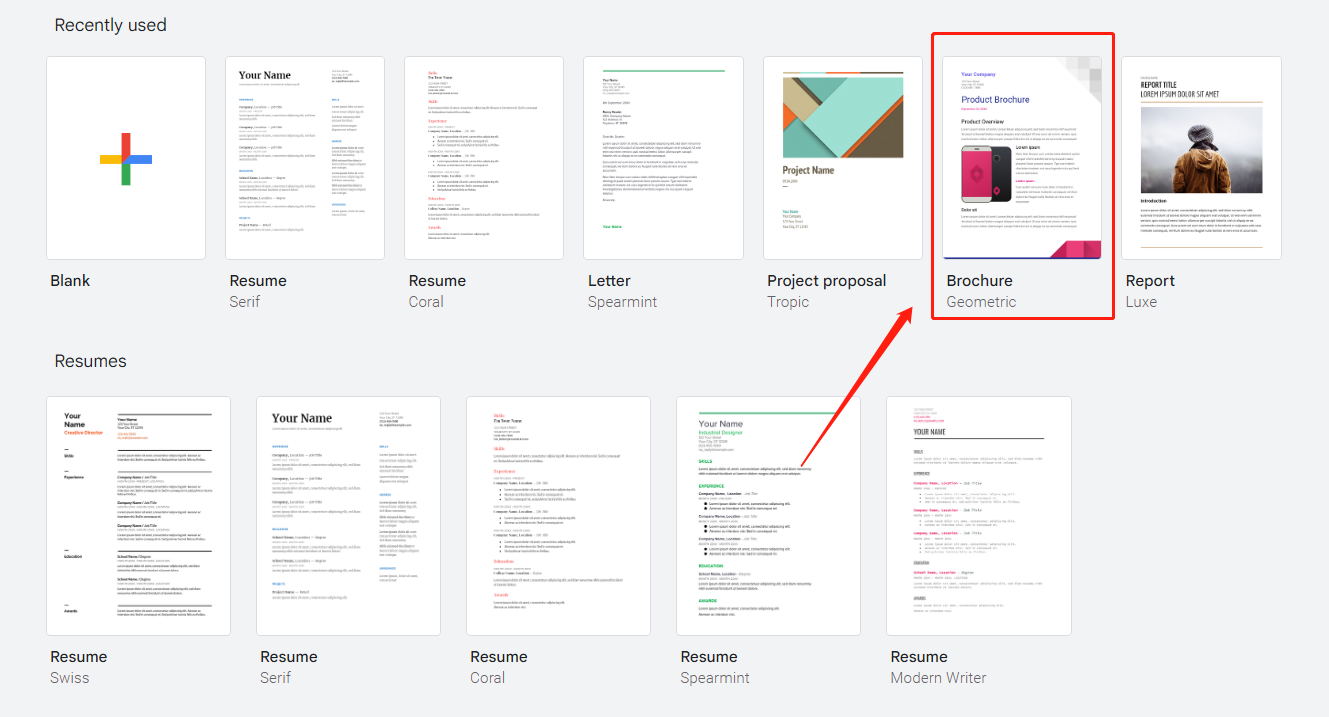
In the template gallery page, you’ll find a slew of various templates to choose from, each suited for different work categories. Among those templates, you should locate the “Brochure” template. By clicking on it, a new document will open with a structure predefined for a brochure.
Google does the heavy lifting here by providing us with a template to work off from. So, you don’t need to construct your entire brochure design from scratch. It’s like having a bit of work done for you already.
Step2: Customizing the Brochure Template

Now that you’ve got your brochure template ready, it’s time to make it your own. Customizing a template is like giving it a personality—your personality. You start with a blank canvas and add colors, font size, images… pretty much everything to make it suit your taste. Wanna turn that dull template into a colorful masterpiece? Here’s how.
Click on different parts of your selected template and start replacing existing images and content with your own. Once you select a section, you should see a format menu appearing that allows you to adjust the text style, color, and alignment. Remember the placeholder text you planned in the first stage? It’s showtime for it.
Right to the table properties, you can inspect how the table is outlined, check the table border width, and fine-tune the table options to fit your requirements.
Feeling daunted by all the choices? Don’t worry! Remember that less can be more and the aim is not to overwhelm the reader. Pick colors that align with your brand or theme, choose clear and legible fonts, and make sure your picture quality is top-notch.
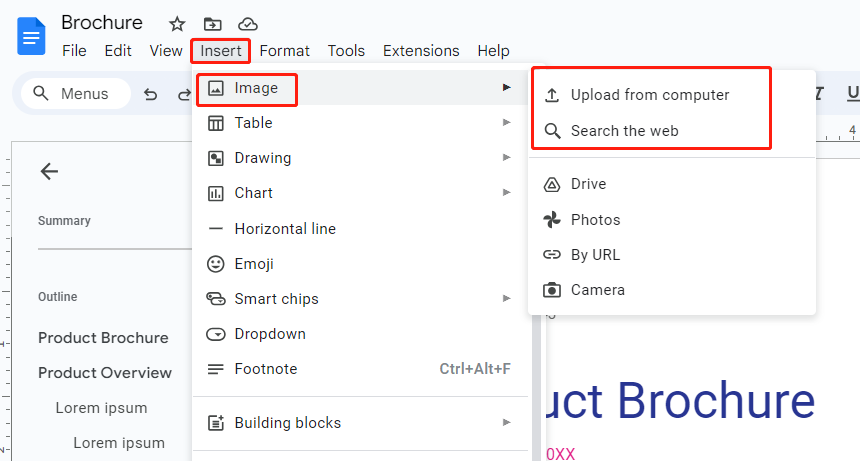
Step3: Adding and Formatting Images in Your Brochure
You know the old saying, a picture speaks a thousand words? Well, in a brochure, this couldn’t be truer. Adding images to your brochure not only enhances its overall appearance but also communicates more efficiently. So, how do we get those shiny pictures there?
You can find the tools for adding images under the “Insert Menu” in your Google Docs menu bar. This option lets you upload images directly from your computer, Drive, or even search Google photos right from the Docs! Imagine having the whole of Google’s image reservoir at your disposal.
After adding your desired images, you may want to replace existing images from the template. Just click the image and hit the ‘Replace Image’ option from your dropdown menu.
You may want to format these images to make them fit well within your content—size, border, and position, every tiny detail counts. To preserve the quality of your images, avoid stretching them beyond their original proportions. Keep them intact.
And, there you go! You’ve jazzed up your brochure with some snazzy images. Now, let’s move on to incorporating those captivating texts and headings.
Step4: Incorporating Text and Headings
Alrighty! No brochure is complete without spilling some ink, metaphorically speaking of course. With Google Docs, adding your text is a walk in the park.
Start by replacing the filler text in your template with your own content. Double-click any text section in your brochure to start typing your own content. This could be information about your company, details about your product or service, or any message that you want your audience to know.
Creating eye-catching headings is vital for guiding your reader through your brochure. They break the page and make it easier to digest the information. Basically, your text should be less of a chunky stew, more of a well-organized bento box! Use the “Format Menu” to adjust the font size, typeface and color of your text and make sure that it aligns with the rest of your brochure design.

Where you position your text matters just as much as the content itself. The text should follow a clear hierarchy, running smoothly from one point to another. Your reader should not be left wondering where to look next.
And remember, despite all these options available for text formatting, the key is readability. The last thing you want is for your reader to struggle reading your killer content!
Alright, the text is sorted. What’s next? Let’s fancy things up a bit more in the next step with some icons and graphics.
Step5: Enhancing Your Brochure with Icons and Graphics
You know, sometimes words just aren’t enough. That’s when visuals like icons and graphics come into play. They add significant value by breaking the monotony of text and helping readers grasp your message more visually.
Icons are a great way to highlight important points and make your brochure more interactive. Brilliant stuff! Consider including them for key features or to emphasize certain points. Of course, keep their design consistent with the overall theme of your brochure.

As for graphics, they might be graphs, diagrams, or any form of illustrative element. They can drastically enhance the way you present data or complex information.Google Docs provides several in-built tools under the “insert menu” to create various graphics.
Okay, so your brochure now has text, images, icons, and even graphics. Now, how about getting everything systematically organized?
Step6: Utilizing Tables and Columns for a Professional Layout
Organizing your content can be a bit like weaving a tapestry. Every thread needs to be in its right place, or the whole thing is a mess. In brochure design, we do that by using tables and columns.
Tables in Google Docs can be a great tool to fine-tune the alignment and placement of your content. Yes, you’ve got it, tables are not just for presenting plain ol’ data. They help you maintain consistent margins, cleanly align the elements, and provide a professional layout to your brochure.
You can adjust the table size and layout by getting into the ‘Table properties’ dialog window. Here, you can adjust the table size, margins, and the border width, among other options. Do you remember how you planned your content earlier? Here’s where you can bring that plan to life!
Columns, on the other hand, help you effectively utilize space, especially when you have a lot of content to present without overwhelming the reader. A brochure document with two or three columns looks professional and is more reader-friendly.
Now that we’ve got the structure down pat with the right tables and columns, it’s time to jazz it all up with some color and appealing fonts.
Step7: Customizing the Colors and Fonts in Your Brochure
In the realm of design, colors and fonts play a pivotal role. They can set the mood, emphasize important points, and assist in structuring your content. Google Docs gives you a plethora of options to choose from in customizing the colors and fonts in your brochure.
Beginning with colors, they can create a visual hierarchy, emphasize, attract attention, or evoke emotions. Use colors judiciously in your brochure for your headings, background, text, and other graphic elements. Be consistent with your color scheme; if you’ve chosen a color combination, maintain it throughout your brochure.
On the other hand, fonts are powerful design elements. They reflect your brand, create familiarity, and can influence the reader’s experience. A well-chosen font enhances readability and comprehension. Google Docs provides an array of fonts under the “Font” dropdown menu. You can even customize the font size and style using the “Format” menu.
Remember, it’s essential to ensure that your chosen colors and fonts align with your brand identity if you’re using the brochure for promotional purposes.
Now that we’ve added color and engaging typography to your brochure, let’s address how to align and format your brochure content.
Step8: Aligning and Formatting Your Brochure Content
When it comes to brochures, alignment isn’t just about lining up images or text. It’s about creating a powerful visual hierarchy that guides the reader’s eye smoothly from one point to another. In Google Docs, you can acquire the right alignment and format through a couple of handy tools.
Under the “Format” option in the menu bar, you have the flexibility to align your text to the left, right, center, or justify it for a cleaner look. You might want to make certain parts of your content stand out by adjusting the font style to bold, italic, or underlined.
Similarly, bullet points or numbered lists can be used to present your content more digestively. Lists are particularly effective when explaining features or steps, like how you’re learning to make a brochure from this guide!
Think of formatting your content like setting a table for dinner. You wouldn’t want your forks and spoons to switch places, would you? The same goes for your content – clarity and order are key.
Step9: Fine-tuning the Design with Spacing and Margins
Once you’ve got your content and basic design elements established, it’s time to turn your attention to the details. Yes, those minute elements like spacing and margins that might seem trivial but do play a significant role in shaping up a professional brochure.
Starting with spacing, this involves the gap between your lines, paragraphs, and individual characters. Proper spacing can make your brochure easier on the eyes and improve overall readability. Google Docs allows you to up the ante by letting you adjust the spacing right from the toolbar—look for the line spacing icon that looks a bit like an ‘E’.
Margins, on the other hand, are the blank spaces around the edges of the document. They separate your content from the edge, making your document look less crowded and more aesthetic. Google lets you personalize margins via the “Page Setup” option under the “File” menu.

With the right balance between spacing and margins, your brochure will look fabulously professional and easy to navigate.
Alright, we’re close to the finishing line here. Up next, let’s shine a spotlight on the star of your brochure – your Call to Action and Contact Information.
Step10: Adding a Call to Action and Contact Information
A brochure without a call to action (CTA) and contact information is like a story without an ending. We’ve enticed readers with our compelling text and visuals, now it’s time to guide them on what to do next.
A call to action is where we prompt our reader to act. This could be anything – visiting your website, calling you for an appointment, or even visiting your store. This needs to be precise, enticing, and prominent within your brochure so that your readers don’t miss it.
Alongside your CTA, your contact information is equally vital. How else will your interested readers get in touch? This section should include different ways your readers can reach or track you – a phone number, an email, or even a physical address.
Remember to place this information strategically so that it’s easily visible, typically in the last part of your brochure. This is where your reader will peek in when they’re interested in taking the next step.
Step11: Proofreading and Editing Your Brochure
Proofreading and editing are the unsung heroes of any great publication. They are the final checks that ensure your brochure is free from errors and ready to go. Yes, this includes typos, grammar mistakes, and other awkward situations that we definitely want to avoid.
Start by checking your text – read it, review it, then read it again. Ensure there are no spelling, grammatical, or punctuation errors. Also, check to see if the text is clear and concise. Every word must earn its place on your brochure. This is also a good time to revisit your content and check if it flows naturally.
Next, check your images and other visual elements. Ensure they are well-aligned, of good quality, and relevant to your content. Trust me, a skewed image or distorted graphic can take away the gloss from your well-created brochure.
Finally, look at the formatting – make sure all elements are aligned correctly, colors and fonts are consistent, your call to action is clear, and the spacing & margins are set as per your preference.
Remember, what separates a good brochure from a great one is the extent to which it has been proofread and edited.
We have covered the content creation stage, and now the last thing left is to save, download, and print your brochure.
Step12: Saving, Downloading, and Printing Your Brochure
Now that all the heavy lifting of designing and editing your brochure is accomplished, all that’s left is to save the masterpiece, download, and bring it to life in a print form.
Google Docs, being the reliable tool it is, automatically saves your work as you progress, so you don’t lose any changes due to unforeseen circumstances. Don’t we all love this feature!
When it comes to downloading your document, you have a variety of supported formats you can choose from, such as .pdf, .docx, .rtf, and more. These options are available under the “File” and then “Download” menu. Choose the format that fits your requirement best.
Printing your brochure involves a few considerations. Ensure you have a duplex printer for double-sided printing. In the print settings, you might want to check the box that says ‘Print on both sides’ or ‘Two-sided’ and select the ‘Flip on long edge’ option. This makes sure your two-sided brochures print correctly.
Congratulations on making it through this step-by-step guide on how to make a brochure on Google Docs! But before you go off on your brochure distribution spree, stay with me for a few more tips to enhance brochure distribution and promotion.
Streamlined steps
For those who love a quick snapshot, we’ve condensed the steps into this neat little table below. It includes the whole process of creating a brochure on Google Docs, providing you with a handy guide that you can reference at any stage of the design process. But remember, all of these steps have been described in detail in this article, so be sure to head back for a thorough understanding and additional tips.
| Step1 | Accessing Google Docs and Choosing a Template |
| Step2 | Customizing the Brochure Template |
| Step3 | Adding and Formatting Images in Your Brochure |
| Step4 | Incorporating Text and Headings |
| Step5 | Enhancing Your Brochure with Icons and Graphics |
| Step6 | Utilizing Tables and Columns for a Professional Layout |
| Step7 | Customizing the Colors and Fonts in Your Brochure |
| Step8 | Aligning and Formatting Your Brochure Content |
| Step9 | Fine-tuning the Design with Spacing and Margins |
| Step10 | Adding a Call to Action and Contact Information |
| Step11 | Proofreading and Editing Your Brochure |
| Step12 | Saving, Downloading, and Printing Your Brochure |
Tips for Effective Brochure Distribution and Promotion

Creating your very own custom brochure is just half the battle won. The next important step is to ensure it gets to the right audience via effective distribution and promotion. So here are some pro-tips to get the most out of your hard work.
Identify your target audience: Get your brochures into the right hands. Who are they intended for? If you’ve got a brochure about a yoga class, droppin’ them off in a fast-food joint might not be the best strategy.
Choose the right distribution channel: This could be handing out in person at events, displaying them in your storefront, or mailing them directly to prospective customers. Of course, digital distribution is an excellent option too—email, your own website, other related websites, and social media platforms.
Promote your brochure: In addition to your distribution strategy, think about ways to amplify your reach. This could be advertising your brochure through your social media platforms, integrating them on your website, or using them as a handout at networking events or presentations.
Keep your brochures updated: Ensure that your brochures are always up-to-date. Outdated information could tarnish your reputation and lessen your brochure’s effectiveness.
At the end of the day, the best tool for promoting your brochure is to ensure it’s designed well and packed with relevant information. With this handy guide on how to make a brochure on Google Docs, we hope you’re equipped to create brilliant, impactful brochures. Happy designing, and best of luck with your promotion and distribution!